
How to Replace an Oven Igniter
I’m going to take a short break from politics today to document how I replaced the igniter on my GE Hotpoint oven.
The problem:
The oven portion of my GE Hotpoint gas oven quit working. More specifically, Bake would not work. The oven never came on and simply sat there, cold and dead.
Symptoms and diagnosis:
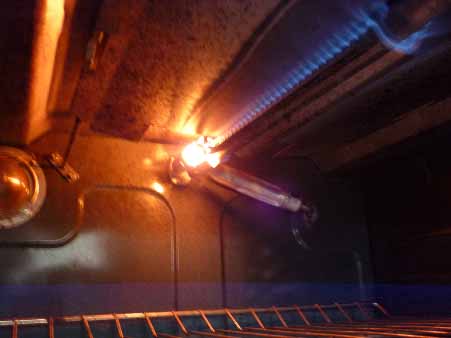
The stove top burners worked fine. So it didn’t appear to have anything to do with the gas connection. Testing further, Broil also worked fine. This is what broil looks like when the igniter first lights the gas. As you can see, the igniter glows.
So I took off the bottom of the oven to see if the Bake igniter looked the same. It didn’t. In fact, it didn’t do anything when I set it to Bake at 350 degrees. This convinced me 99% that I had a bad igniter.
Do It Myself or Call a Repair Shop?
My official model is: RGB745WEH6WW. Looking up the part online, it cost just over $50.
Not bad. Not that I wanted to spend $50, but that wouldn’t be too bad if I could get my oven back.
Still I was a little worried about installing it. So I called a repair shop and asked them how much it would cost to fix a damaged igniter on my oven. The folks at the repair shop seemed knowledgeable and told me that it depended on which type of igniter I had. There were 2 general kinds I was told: a round one and a square one.
Since I knew I had the round one, I asked about this one. He said that was the more expensive of the two so the repair would likely run about $175 including the new igniter part.
That was when I thought to myself, maybe I could do this myself. I told the repair shop I’d call them back.
Repair
So this is what I did to replace the igniter.
1. I ordered the new igniter through Appliance Parts Pros online – AP2014008. They said that it would likely arrive within two days even with the standard shipping. They didn’t lie. Two days later the part came.
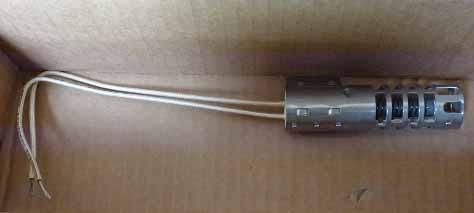
Since this part appears to fit a large number of different gas ovens including may Kenmore, GE, and Hotpoint, I believe this fix will apply to many gas ranges.
2. I unplugged the oven and shut off the gas valve.
3. I had already removed the bottom of the oven in order to see the ignitor. Now, I pulled out the Storage Drawer to see if I could get at it from below. I found that there was a panel above where the Storage Drawer slid in that could be removed by taking out 4 screws. Now I could access the igniter from the top and the bottom.
4. To remove the igniter from where it was connected, I found I had to do this from below. I removed 2 screws and the ignitor was free.
5. I took a piece of tape and wrapped it around the wire which connected into the top of the igniter. Online reviewers stated that it didn’t matter which way you connected the wires. But this way I’d know which wire went into the top of the igniter and which the bottom so I could connect them exactly the same (just in case).
6. I cut the wires on the old igniter. Then, I stripped off the insulation about 1/2″ back from where I’d made the cuts. I connected the top wire of the igniter to the tape-wrapped wire from the oven. I twisted on the electrical connector that came with the new igniter – the ones that came with the new igniter were ceramic and heat tolerant. I then did this for the bottom wire.
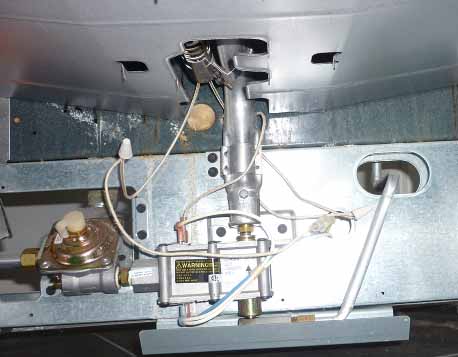
When I’d finished connecting the wires (if you give them a pull they shouldn’t come out of the electrical connector), I moved the wires down below and screwed the ignitor back in. The picture below shows underneath the new igniter.
7. I turned the gas valve back on and plugged in the oven. Setting the oven to Bake at 350, I said a little prayer and turned it on. Voila!
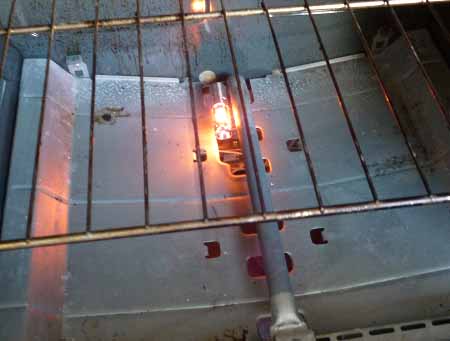
This is what the ignitor should look like when it’s working correctly. Good luck and hope this helped!


